


Stressed Out About “Too Many Passwords”?
An Employee joins a new organization, on very first day of his joining he is given access to his email account and once he is successfully registered and sign in to his machine and access other COMVIVA Internal sites, Bingo, magic happens, he is signed in without even entering any credentials.
Overview SAML (Security Assertion Markup Language)
Security Assertion Markup Language is an XML standard which allows users to login their application using session information. This allows users not to enter username, password every time they want to login. Let us understand this in detail.
There are two parties involved in the complete process. Service Provider and identity Provider.
SP (Service Provider) – In Above example all websites are service providers, SP establishes trust between SP – IDP by exchanging metadata information.
IDP (Identity Provider) – Authenticates the user and returns users identity information back to service provider.
Let us see the detailed overview in next section.
How does it work?
Now we know that there are two parties involved in this process, step by step flow is as below-
- Prepare your application (Service Provider).
Refer: Are we ready for SSO Integration?
- Configure IDP – Ask IDP to share IDPs metadata XML / or metadata URL and configure it inside SP.
- Generate/Build Service Provider metadata XML.
- Share SP metadata XML with IDP and get it configured on IDP.
- You are almost ready!
Till now you have established trust between SP and IDP via metadata exchange, since IDP has your identity it can trust you and can work for you as an Authenticator.
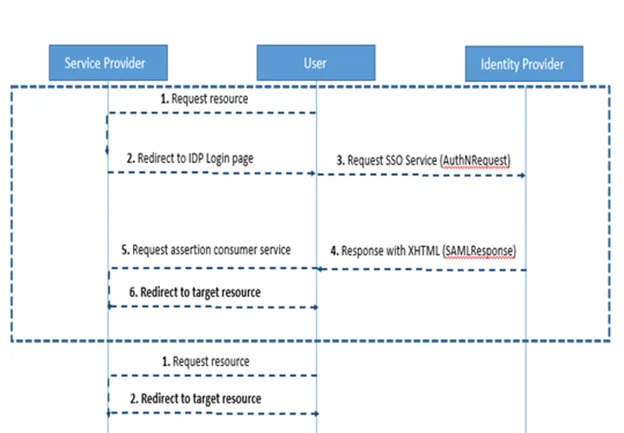
- User opens application in browser say Google Chrome.
- User is redirected to IDP login page.
-How? Since we have configured IDP metadata information in Service Provider, Service Provider knows where to go for Authentication.
-(This is SP initiated scenario, in case of IDP initiated SSO, user opens IDP page and after authentication, he is redirected to SP).
-User enters credentials and after successful authentication he will be redirected to Service Provider Home Page.
– Since we have configured SP metadata on IDP, IDP knows where to redirect after authentication.
– Here IDP has provided all relevant information to Service provider which is available in session.
– User opens another internal application, he gets logged in automatically without even entering credential.
– – – How? – Another application is a service provider for same IDP, SSO works on session, since there is already established trusted session alive, IDP redirects user to SP home page.
Are we ready for SSO Integration?
Very first step is to generate Service Provider’s metadata XML file. There are online tools available which can be used for metadata creation. Ex. https://www.samltool.com/sp_metadata.php
If your technology provides metadata support (SAML Support) out of the box then you have an extra glass of beer. Ex. Spring SAML SSO.
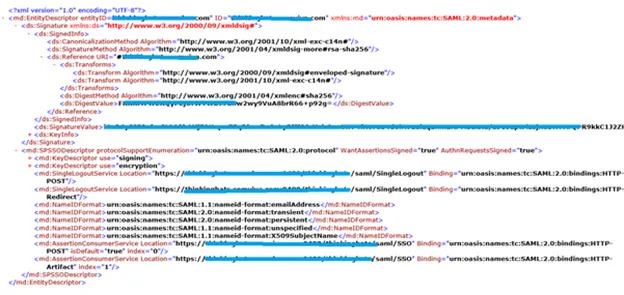
Main attributes of metadata xml
EntityId – Globally unique identifier
Assertion Consumer Service URL – An endpoint is your application which accepts / can parse SAML Response received from IDP after authentication.
NameId Format (Optional) – NameId format supported by IDP. Ex.

SP X.509 cert (Optional)
AuthnRequest Signed (Optional) – Boolean
Assertions Signed (Optional) – Boolean
Organization Info (Optional) etc.
Sample SP Metedata
Few Points in consideration –
- Technology Stack which is being used by SP should support SAML SSO.
- Make your application SSL enabled/ready.
- Get your Domain name registered.
- If application is not hosted on Cloud machine i.e. is not available publically, get your server demilitarized.
- Compile and check application from security perspective. You can refer online tools ex. http://ssl-checker.online-domain-tools.com/
A Note – Create CSR & Install SSL Certificate
SSL certificates are used for SSL/TLS encryption, contain the website’s public key and identity, along with related information. Typical steps for certificate creation are as under:-
- Create a new KeyStore. ( Using Keytool, OpenSSL )
- Create Your CSR and Share it with Vendor (Note : Instead of keyTool, OpenSSL, vendor Specific tool can be used for CSR creation)
- Once you receive SSL/TLS certificate from vendor , you will have to install it.
- Install SSL/TLS certificate to keystore.
- Refer final binary to any application.
Now we will practically see above steps
- keytool -genkey -keystore myKeyStore.jks -alias xyz.comviva.com -keyalg RSA -sigalg SHA256withRSA -validity 365 -keysize 2048
- keytool -certreq – alias xyz.comviva.com -file csr.txt -keystore myKeyStore.jks
- We received SSL/TLS – cert-chain.pkcs12
- keytool -importkeystore -srckeystore cert-chain.pkcs12 -srcstoretype PKCS12 -destkeystore myKeyStore.jks – Here use same alias as used in step 1
If you have separate files for certificate and key which you have shared with vendor, along with root and intermediate certificates, you can combine them.
